Blog Entry 7
Hello my fellow supporters, I'm extremely glad that you have followed my blogpost up till this point in time. This is Blog Entry 7 and it will also be the last blogpost of this semester. Soooo what will I be sharing with you on my final blog entry?? Well... The final product!! After the course of one semester we have finally reached the end goal of this module which is to present to the class about our idea and design prototype. Without further ado let me show you the Journey....
Preliminary ideation
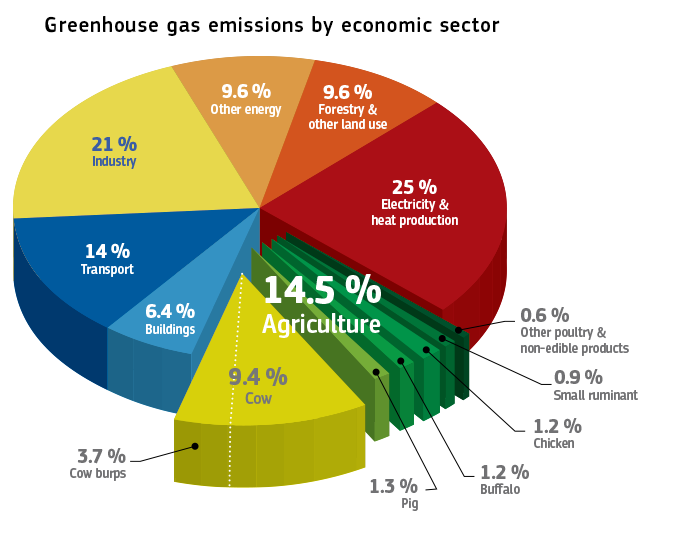
During the early days of our design ideation process, looked at common issues with our world and found out that global warming is the one we wanted to target. One of the main contributors to global warming is cattle ranching. It is estimated that approximately:

from cattle ranching and it is contributes to a whopping 14.5% of all greenhouse gases
This is an amount that will only grow higher as the demand for meat increases as well as world population of meat consumers. To help reduce that amount of greenhouse gases emission due to meat consumption, we decided to design a "Fake Meat" Machine.
Design Sketches
This was the initial design we came up with:

It started with a humble sketch on a piece of post it-note
Then it became an improved version of the sketch on the whiteboard:

Finally our final sketch:

Photos and Videos of the fabrication process.
When constructing a prototype of the product, we met up at one of our member's house to construct it together. Here are some pictures of our team members in action!! 😎😎


Hero shot of the finish product
Turns out one afternoon of constructing this elaborate design wasn't enough. We left it at our teammate jinghui's house and she did some touch up and took a few pictures of the final product 😁😁


Video of the product in operation

Parts of the Design


Describe how the product works
Now after watching the video you should have a better understanding of the product already. Ill now go true the steps in detail so you know the importance of each step.
Step 1: Pour the ingredients into each of the compartments
Step 2: Press the button on the side of the machine
Step 3: After the dough have been mixed for 5 minutes, pull the tray separating the top and bottom layer.
Step 4: Push the piston to press the dough against the mould
Step 5: After 10 minutes the piston will retract and the "meat" is ready to be taken out
Addition info:
There are four compartments to this machine. Three of the compartment is for the main ingredients which are Wheat Flour, Water and Yeast. The last compartment gives the consumer options to customise their food. For instance, they can add some beetroot powder to the last compartment to make the fake meat look more reddish or they can add more soy sauce to make it saltier.
Talk about the operating principles/mechanism
Some of the operating principles in this design include using the concept of Heat Transfer, Agitation/Mixing, and Batch Process.
Heat transfer happens when the dough is pushed against the mould by the piston. The mould is connected to a heater behind which helps to heat up the dough. There is heat transfer from the heater to the dough.
Agitation/Mixing occurs when all the ingredients are poured into the top layer of the machine. The stirrer will start and will mix all the raw ingredients together and after around 5 minutes a dough will be formed.
Lastly it is also a batch process where by ingredients are put in in set quantities to yield one portion of meat. It is also not a continuous process which means ingredients are constantly being poured in
Specification Table


Comments
Post a Comment